How to Create a Custom Block in Drupal 8/9/10


Originally published on November 2nd 2018. Updated with current information for Drupal 9 and 10.
Table of contents
- What are Blocks in Drupal?
- Guide requirements / prerequisites
- Implementation
- GUI implementation
- Programmatic implementation
- Rendering of the block
- Troubleshooting
- In-depth examples
- Using Twig to render block content
- Implementing custom configuration form for the block
- Attaching custom CSS/JS libraries
- Using context_definitions
- Conclusion
What are Blocks in Drupal?
Blocks are boxes of content which are rendered on a specified part of the site. Examples of a block would be social sharing buttons, Who’s online, Recently viewed content, Social media feeds, etc…
The Custom Blocks that come from the GUI are blocks of content similar to node entities. This guide offers a quick overview of implementation of these types of blocks, but is mostly focusing on the Custom Blocks that can be implemented via development of a custom module.
Guide requirements / prerequisites
For both implementations:
- Drupal version > 8.x
- Enabled Block and Custom Block modules (usually Drupal has these enabled already, I’m leaving this information here in case that they aren’t)
- Familiarity with basic Drupal theming concepts (understanding of theme regions)
For the programmatic implementation:
- Knowledge of PHP
- Knowledge of custom module development in Drupal (YAML, namespaces, modules folder structure)
Implementation
All the blocks currently present on the site are available in the ‘Block Layout’ section of the ‘Structure’ menu. The blocks in the Block Layout are placed into the regions. By clicking on the link ‘Demonstrate block regions’ the site will display on which part of the page a block will be rendered (sidebar, header, footer, etc…).
GUI implementation
- Go to admin -> structure -> block layout -> custom block library.
- Click the ‘block types’ tab. Once here, click on the ‘Add custom block type’ button.
- Enter block label and description.
- Now, you can add fields, manage display type, manage display etc. for your custom block. Customise the block to your liking and click save.
- Now, go back to the custom block library and click the blue ‘Add custom block’ button to add the block to your library.
Programmatic implementation
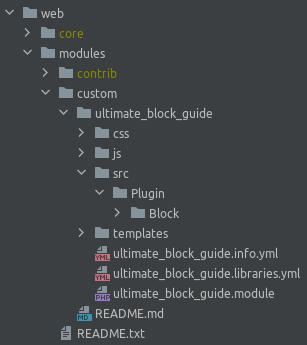
Create a module and the folder structure in which your custom block implementation will reside:
YAML file
name: Ultimate block guide
description: Provides programmatic examples of the Ultimate block guide.
type: module
core_version_requirement: ^8.8.0 || ^9 || ^10
dependencies:
 - drupal:block
 - drupal:config
Create a block class
- Annotation: Drupal uses annotations to describe the metadata of the Plugin (in our case a block) and also uses them to register plugins. The block can be annotated by the following parameters:
- Id -> ID of the Block -> Mandatory
- Admin_label -> Label which will appear in GUI -> Mandatory
- Category -> Blocks are put in categories in the admin UI, defining this parameter will put the Block in the specified category -> Optional
- Context definitions -> If our plugin requires any additional objects to do its work then we can provide them in the Context definitions section of the annotation -> Optional
- Namespace: In order for the custom block to be recognized by Drupal it also needs to be in the proper namespace.
- Class methods:
- Required
- build(): This methods returns the render array of the block.
- Optional
- label(): Returns a string with a block label.
- access(AccountInterface $account, $return_as_object): Checks whether the current block will get displayed for a user or not.
- blockForm($form, FormStateInterface $form_state): Used for definition of additional form fields in the blocks configuration form. Returns form array.
- blockValidate($form, FormStateInterface $form_state): Validates the values provided by the user when configuring form.
- blockSubmit($form, FormStateInterface $form_state): Code to be executed when the configuration form gets submitted.
- Required
- Class methods:
<?php

namespace Drupal\ultimate_block_guide\Plugin\Block;


use Drupal\Core\Block\BlockBase;


/**
* Provides a block with a simple text.
*
* @Block(
*   id = "ultimate_block_basic",
*   admin_label = @Translation("Ultimate guide to blocks: basic"),
*   category = "Examples"
* )
*/
class UltimateBlockBasic extends BlockBase {

 /**
  * {@inheritdoc}
  */
 public function build() {
   return [
     '#markup' => 'This is a simple block that displays some text!',
   ];
 }

}
Rendering of the block
Now that you’ve created your own block, either by using GUI or programmatically, it is time to place that block on the site. To perform that navigate to Structure -> Block layout. Then select the region in which you want the block to be placed. Click on the Place block button next to the region, find your block in the list of available blocks and then configure its options. Navigate to the page on your site where the block is displayed, and voila :).
Troubleshooting
In case something goes wrong and your block doesn’t appear you can use the following tips to figure out what went wrong.
- The class name and the file name must be the same (
class HelloBlockandsrc/Plugin/Block/HelloBlock.php). If the class name is different, the block will appear in the list of available blocks, however, you will not be able to add it. - Be sure to double check all paths and filenames. Your .php file must be in the correctly labelled directory (
src/Plugin/Block/), otherwise it won't be discovered by Drupal. - If your block fails to place in a region with no error on screen or in watchdog, check the PHP / Apache error logs.
- If your block is not on the list, be sure to rebuild the Drupal caches (e.g.
drush cr).
In-depth examples
Using Twig to render block content
Drupal uses the Twig template engine to display the content. You can extend the custom code in your block to render a block with a Twig template.
To achieve this you have to set up the following:
Register a template in hook_theme
/**
* Implements hook_theme().
*
* We use hook_theme to define the templates used.
*/
function ultimate_block_guide_theme($existing, $type, $theme, $path) {
 return [
   'basic_twig_block' => [
     'variables' => [
       'text' => '',
     ],
   ],
   'css_block' => [
     'variables' => [],
   ],
   'js_block' => [
     'variables' => [],
   ],
   'context_block' => [
     'variables' => [
       'name' => NULL,
     ],
   ],
 ];
}
Create a Twig template
{% if text is defined  %}
 <p>{{ text }}</p>
{% endif %}
Use ‘#theme’ key in the Block Plugin to specify
/**
* {@inheritdoc}
*/
public function build() {
 return [
   '#theme' => 'basic_twig_block',
   '#text' => 'This is a block that was rendered with twig!',
 ];
}
Implementing custom configuration form for the block
You can extend your block to have additional configuration options. This is achieved in the Block Plugin class by using the blockForm and blockSubmit methods. Optionally if you want to perform custom validation on the form fields you’ve added, you can use blockValidate methods.
blockForm($form, FormStateInterface $form_state)
The example here offers the admins to enter a custom text message that will be rendered as part of the block. In the method we first pull all the default configuration options and add an additional field to store custom text messages.
/**
* {@inheritdoc}
*/
public function blockForm($form, FormStateInterface $form_state) : array {
 $form = parent::blockForm($form, $form_state);

 // Retrieve the blocks configuration as the values provided in the form
 // are stored there.
 $config = $this->getConfiguration();

 // The form field is defined and added to the form array here.
 $form['message'] = [
   '#type' => 'textarea',
   '#title' => $this->t('Message'),
   '#description' => $this->t('Type the message you want visitors to see'),
   '#default_value' => $config['message'] ?? '',
 ];

 return $form;
}
blockSubmit($form, FormStateInterface $form_state)
In the submit method we store the value that has been entered into the configuration so that it can be retrieved when the block gets rendered.
/**
* {@inheritdoc}
*/
public function blockSubmit($form, FormStateInterface $form_state) : void {
 // We do this to ensure no other configuration options get lost.
 parent::blockSubmit($form, $form_state);

 // Here the value entered by the user is saved into the configuration.
 $this->configuration['message'] = $form_state->getValue('message');
}
blockValidate($form, FormStateInterface $form_state)
We perform validation here. In the example provided in the module we prevent users from entering a specific string of text.
/**
* {@inheritdoc}
*/
public function blockValidate($form, FormStateInterface $form_state) : void {
 // The configuration form validation is performed here.
 // In this example we don't want the message text to be 'Helloworld!'
 if ($form_state->getValue('message') === 'Hello world!') {
   $form_state->setErrorByName(
     'message',
     $this->t('You cannot enter the most generic text ever!')
   );
 }
}
Attaching custom CSS/JS libraries
Sometimes you would like your block to use some functionality or custom styling that is applicable on the block. We can attach custom CSS and JavaScript libraries (both external and those you develop yourselves) to the block. There are 2 different ways we can achieve this on the block.
Using the ‘#attached’ key in our render array
/**
* {@inheritdoc}
*/
public function build() {
 return [
   '#theme' => 'js_block',
   '#attached' => [
     'library' => [
       'ultimate_block_guide/js_lib',
     ],
   ],
 ];
}
Here is an example on how a JavaScript library that has been added to the module is attached to the block.
Usage of attach_library(module_name/library_name’) in the Twig template
{# You can attach a library with attach_library function #}{{ attach_library('ultimate_block_guide/css_lib') }}
<p class="custom">This text is styled by the custom.css library attached to the twig template rendering this block.</p>
Using context_definitions
There are cases when our block requires additional objects or resources to work. We can specify which objects are required by using the context_definitions in the Annotation of our Block plugin.
/**
* Provides a block that uses twig to render its content.
*
* @Block(
*   id = "ultimate_block_context",
*   admin_label = @Translation("Ultimate guide to blocks: Context"),
*   category = "Examples",
*   context_definitions = {
*     "user" = @ContextDefinition("entity:user", label = @Translation("User"))
*   }
* )
*/

try {
 // Get the context value. If the context is not found, ContextException
 // is thrown. Make sure to handle it accordingly.
 /** @var \Drupal\user\Entity\User $user */
 $user = $this->getContextValue('user');
}
catch (ContextException $e) {
 // Handle the exception here.
}
In this example we would like to render a custom message for the user to appear. For this to work we need the object of the user currently viewing the site. We specify that the User entity is required in the context_definition. We can then retrieve the value of the user object by using $this->getContextValue(‘context_name’). There are cases where the Context can’t be found, so the getContext methods throw an ContextException error so we must handle those accordingly.
Conclusion
Blocks are an integral part of the Drupal ecosystem and hence of any Drupal website. Knowing how to create and customize blocks is an important skill for any Drupal developer, and we hope we were able to give you some useful pointers in this guide. All code examples are available on our GitHub profile.
If you need some additional help customizing your Drupal site, reach out to us at Agiledrop and learn more about how our skilled Drupal developers can help you out.